Details of the Abdominal Aortic Aneurysm
Masterscript High Detail Operating System www.mhdos.info
ALL the know- how + ALL the what-ifs
Michael Edwards FRCS Emeritus Consultant General Surgeon
Friarage Hospital, Northallerton, North Yorks, DL61JG UK
With thanks to Dr Rajiv Patel for advice about local anaesthesia. (See Chapter 20). Dr Patel holds the degree of Master of Clinical Dentistry degree in Periodontics from Kings College, London. He specialises in treating nervous and anxious patients
Last edited 04 07 2020
1 Introduction to MHDOS
2 Structure of MHDOS – Steps and Backup information
3 Example of a Step.
4 Categories of Backup information.
5 Examples of Backup information used in the Step – “Incise the skin”.
6 Whole text for MHDOS Chest Drain. (LocSSIP)
1 Introduction to MHDOS
Have you ever felt let down when trying to perform a surgical procedure from an operative surgical text book, a How I do it article, video or a simulation?
The anatomy is different, the pathology is different, bits seem to be left out, the descriptions are obscure, you get into trouble and have to improvise or guess?
The main problem is that these information sources all lack 90% or more of the information that an expert surgeon has at his/her fngertips when operating.
MHDOS is the only operative surgical training system that aims to provide all that missing 90%.
The amount of information can be very large for complex major operations and even for minor procedures is strikingly larger than standard low detail sources.
Nevertheless, using the basic structure of MHDOS, any operation can be fully described.
2 Structure of MHDOS – Steps and Backup information Each operation is divided into an unlimited number of small Steps.
Each Step is supported up by an unlimited amount of Backup information.
3 Example of a Step eg “Incise the skin”.
4 Categories of Backup information in MHDOS. The backup information comes in one or more of 40+ categories.
For simplicity, these categories are arranged into three main groups.
Basic information
Problem – avoiding information
Problem – correcting information
For ease of remembering, the categories are given acronyms.
BASIC INFORMATION
Acronym WWWW.WIMBLEDON
Why do this?
What is the anatomy?
What does it look/ feel/
sound/ smell/ (taste) like?
What does it do?
Who does this?
Instruments
Materials
Beginning
Landmarks
End point
Do it this way
Other ways
No-no’s
PROBLEM – AVOIDING INFORMATION
Acronym DITCHES TROGS
Dangers
If: an algorithm eg If a happens, then do b
If: an alternative eg If you can’t do c, then do d,
If you still can’t do c, then do e etc.
If: an inference eg If f and g and h, then probably do i
Tips
Checks and Checklists. In case you forget.
Hints
Evidence
Suggestions
Test Eg Test the length of a graft before cutting it.
Review Ie. Progress made so far
Order Eg.Identify gonadal vein before ureter
Guideline A recommended overview
Safety Standard An agreed way of doing something safely.
It is NOT just a record of what has
been been done.
PROBLEM – CORRECTING INFORMATION
Acronym SUPERMAN.COM
Surprises Ie The opposite to common sense.
Eg Pull a colonoscope out to make the tip advance.
Unpredictable Ie. No way of working this out from basic principles.
Problems
Errors
Rectifying errors
May day Ie. When to call the boss
Anything else
Notable cases Eg Video of life threatening delay with too short an incision for a chest drain tube
Communication
5 Examples of Backup information used in the Step – “Incise the skin” in MHDOS Chest Drain.
█ Why incise the skin?
The skin is too tough for
blunt dissection, unlike the
deeper tissues.
█ What is the anatomy of the
skin?
Bundles of tough collagen
fibres.
Sharp dissection needed.
█ What is the anatomy of the
surgeon’s forefinger?
The skin incision must be
long enough to admit the
surgeon’s forefinger.
The base of the surgeon’s
forefinger usually has a
circumference of 8cm.
The skin incision must be
4cm. long.
(ie two 4cm sides, making
8cm.) to match the
circumference of the
forefinger).
█ Instruments
Include a ruler, because the
trainee may not know the
circumference of his/her
forefinger nor be able to
make a 4cm. incision
accurately.
█ Materials
A 28 French gauge chest
drain has a
circumference of 28mm.
Compare this with a
forefinger having a
circumference of 8cm.
(ie 80 French gauge).
█ Notable case
In the case below, two fundamental mistakes are leading to life-threatening delay.
One, the skin incision is too short. Two, the surgeon, under the extreme stress of the situation, fails to realise this and does not make the decision to lengthen the incision.
Training with MHDOS Chest Drain would have prevented these errors.
ETC
6 Whole text for MHDOS Chest Drain – (LocSSIP)
NB None of the information in this MHDOS should be used without the agreement of a fully trained practising surgeon.
Contents Page
Chapter 1.00 What is a LocSSIP? 4
Chapter 2.00 Introduction to Chest Drain Insertion 5
Chapter 3.00 This LocSSIP covers: 6
Chapter 4.00 This LocSSIP does not cover: 7
Chapter 5.00 Layout of Operation Sections and Steps 7
Chapter 6.00 Anatomy Review 8
Chapter 7.00 Pathology review 10
Chapter 8.00 Instruments and materials review 12
Chapter 9.00 Operation review 14
Chapter 10.00 Environment 14
Chapter 11.00 Check the personnel 15
Chapter 12.00 WHO Sign in and Time Out and Preliminaries 15
Chapter 13.00 Position 20
Chapter 14.00 Check the skin marking 20
Chapter 15.00 Scrub up 20
Chapter 16.00 Stance 20
Chapter 17.00 Skin Preparation 21
Chapter 18.00 Towelling up 21
Chapter 19.00 Check the on-table instruments and materials 21
Chapter 20.00 Local anaesthesia 22
Chapter 21.00 Making the incision 24
Chapter 22.00 Needling the pleura 26
Chapter 23.00 Opening the pleural space 27
Chapter 24.00 Inserting the drain 28
Chapter 25.00 Suture the drain 29
Chapter 26.00 Connect to Under Water Seal system 30
Chapter 27.00 Final Touches and WHO Surgical Safety Checklist Sign Out 31
Chapter 28.00 Postoperative care 31
Chapter 29.00 Equipment and materials 33
Chapter 30.00 Feedback, Comments and Audit 34
Chapter 31.00 Alterations, Additions, and Amendments 34
Chapter 32.00 Insertion of chest drains during thoracotomy 34
Chapter 1.00 What is a LocSSIP?
A LocSSIP is a Local Safety Standard for Invasive Procedures.
First of all, a Safety Standard is an agreed way of doing something safely.
https://www.bsigroup.com/en-GB/standards/Information-about-standards/what-is-a-standard/
An Invasive Procedure is one where the patient’s body is entered, such as by an operation, by needling, or by pushing in a tube.
To reduce errors made during Invasive Procedures, in 2015, NHS Improvement in the UK set up Safety Standards for Invasive Procedures at a national level. (NatSSIPs).
https://www.england.nhs.uk/patientsafety/never-events/natssips/
NatSIPPs aimed to guide hospitals in setting up their own Safety Standards at local level. (LocSSIPs).
BUT
NatSSIPs do not contain any information about safe ways of performing the invasive part of the procedures.
Most LocSSIPs contain very little.
https://improvement.nhs.uk/resources/examples-local-safety-standards-invasive-procedures/
However, the LocSSIP you are looking at now is based on MHDOS (Masterscript High Detail Operating Surgery).
MHDOS enables the LocSSIP to provide all the information that an expert uses to perform an invasive procedure safely.
This includes all the WHO pre- and post-operative Surgical Safety Checks, plus how to perform them to the highest standard.
Plus the multitude of per-operative safety checks, all scenarios and all the what ifs.

The amount of information in an MHDOS script is more than 10 times the amount in other operative sources such as operative textbooks, how I do it articles, videos and simulations.
Without all this information, a practitioner cannot claim to be an expert.
Chapter 2.00 Introduction to chest drain insertion.
The tube is pushed between the ribs into the space between the ribs and the lungs called the pleural space.
The pleural space lies between the ribs, the lungs and the diaphragm.
Abnormal fluid in the pleural space (gas or liquid) drains out through the tube.
The fluid is collected in a bottle which has a non-return valve to prevent the fluid draining back into the patient.
The non-return valve described in this script is called an Under Water System (see Step 12.08 page 17).
However, the system contains 0.9 % saline, not water.
Using water could lead to haemolysis, kidney failure and death.
Fluid will not flow back into the chest as long as:
• The collecting bottle is below the level of the patient’s chest.
• The long tube in the bottle is 2cm. below the surface of the saline.
Correct insertion of a chest drain (also called pleural drainage or thoracostomy) can save lives.
If performed incorrectly or when contraindicated:
At best, it is ineffective or risks introducing infection.
At worst, it can cause lethal injuries to the lung, heart, liver, spleen, and stomach.
In 2008, the National Patient Safety Agency reported 27 cases of death or serious injury associated with faulty chest drain insertion.
Chapter 3.00 This LocSSIP covers:
Insertion of chest drain for:
Haemothorax
Blood in the pleural cavity often caused by trauma.
Malignant effusion
Liquid in the pleural cavity from malignant deposits in the wall of the pleural space.
Pneumothorax
Air in the pleural cavity usually leaking slowly from the lung.
Tension pneumothorax
Air under pressure in the pleural cavity from a large leak from the lungs.
Postoperative pleural effusion with or without a pneumothorax.
Often caused by a leak from an operation to join the stomach to the oesophagus in the chest.
Patients with bleeding disorders are not excluded as long as the conditions are controlled.
Chylothorax
Liquid that leaked into the pleural space from a damaged lymph duct.
Chest drain during thoracotomy.
Here the drain is pulled through the chest wall from inside to out, instead of
being pushed from outside to in, as in all the above.
Chapter 4.00 This LocSSIP does not cover:
Empyema drainage – this condition is best treated with VATS (Video Assisted Thorascopic Surgery). See on.
Seldinger technique – a way of making the path for the tube into the pleural cavity using a series of progressively larger diameter needles.
Flap valve drainage
Chapter 5.00 Layout of Operation Chapters and Steps.
The structure of a MHDOS/ LocSSIP consists of an unlimited number of Chapters.
Each Chapter is divided into an unlimited number of small Steps.
Each Step consists of an unlimited amount of information.
The information comes in one or more categories.
There are 3 main categories of information.
Basic information.
Problem- preventing information.
Problem- solving information.
Each category of information is divided into further sub categories.
Chapter 6.00 Anatomy review.
Pleural spaces.
This is a potential space, on each side of the chest, between the inside of the ribs, the lungs and the diaphragm.
The mediastinum with the heart, great vessels, lower trachea and bronchi lie between the two pleural spaces.
Each pleural space is completely lined by a thin sheet of tissue, the pleura.
The part of the pleura covering the lungs is called the visceral pleura. It is insensitive.
The pleura covering the inside of the rib cage is called the somatic pleura. It is very sensitive.
The pleura also lines the fissures (cracks) that separate the lobes of each lung.
The pleural cavity is normally just a potential space filled with a few millilitres of tissue fluid.
Disease processes lead to the space filling with various fluids, both gases and liquids.
The organs surrounding the pleural space can be damaged by insertion of chest drains.
Previous surgery or infection in the pleural space may lead to adhesions between the visceral and somatic pleura.
The ribs
The intercostal arteries, veins and nerves run in grooves on the lower, inner sides of the ribs.
They can be damaged by dissecting and inserting chest drains too close to the lower margins of the ribs.
A safer route is over the rib below the intercostal space and through the pleura well below the neuro-vascular bundle.
The drain tube makes a softer curve, unlikely to kink.
This also makes an oblique tunnel that will virtually close itself when the drain is removed later.
A direct tunnel may lead to a channel for air to enter the pleural space on drain removal.
The periosteum of the ribs is very sensitive.
The lungs, great vessels and heart
These organs can be damaged by the insertion of a chest drain if the pleural space is only moderately expanded by fluid.
Liver and spleen
The domes of the diaphragm curve acutely upwards. They place the liver and spleen at risk of damage by dissecting or inserting a chest drain through the diaphragm.
Chapter 7.00 Pathology review.
Different types of fluid in the pleural space are usually named as a Something-thorax. An exception is pus in the pleural space – empyema
Empyema
An old term, meaning pus in the pleural cavity.
It is a complication of lobar pneumonia.
The pleura near the pneumonia is inflamed initially and exudes an inflammatory liquid.
Later, the pleura thickens with a fibrinous exudate,
The layers of pleura stick together.
The pleura thickens like orange peel.
Thick pus builds up inside the thickened pleura with strands of fibrin crossing it. (Septa).
The consistency of the pus can be like thick porridge.
The pus can form pockets (loculi) and involve the fissures between the lobes of the lungs.
The condition can progress to dense thickening of the pleura with possible rupture into the lung to form a broncho- pleural fistula
Aspiration is not very effective because of the thickened pleura and the thick pus.
Drainage of the pus and loculi is not usually successful.
Videoscopic Assisted Thoracic surgery (VATS) is the treatment of choice before the adhesions are too dense.
Ie Keyhole removal of the pockets of pus and surrounding thickened pleura.
Decortication (extensive opening of the chest and removal of pleura and pus) may be needed for failed tube drainage or delayed VATS.
Pneumothorax and tension pneumothorax.
Puncture of the lung by fractured ribs, gunshot wounds, knife wounds and explosions.
Rupture of a bulla on the surface of the lung.
Rupture of oesophagus.
Leak from oesophageal anastomosis.
Leak from necrotic intra- thoracic stomach.
Haemothorax and Haemo/pneumothorax
Bleeding usually follows:
Trauma to the chest (including iatrogenic trauma).
Rib fractures.
Lung injuries.
Great vessel and heart injuries.
In severe cases, there may be a haemothoraxes on both sides, needing bilateral chest drainage.
Minor haemothoraxes are usually managed by chest aspiration.
Malignant effusion
Deposits of tumour on the pleura may provoke an effusion of serous fluid in the pleural cavity.
Mucus secreting tumours may produce thick mucus that needs chest drainage.
Postoperative pleural effusion
Leak from an anastomosis between oesophagus and stomach or small bowel.
Leak from a necrotic intrathoracic stomach.
Food solids and liquids, saliva and swallowed air will empty into the pleural space.
Chylothorax
Chyle is white, fat-laden lymph from the bowel.
It runs through the cisterna chyli and lymph ducts in the posterior mediastinum at the back of the pleural spaces.
It enters the venous system near the left subclavian vein.
If the lymph ducts are damaged by oesophageal surgery, the lymph will build up in the pleural space.
The leakage in most patients will seal off spontaneously with repeated chest aspiration for a week or more.
The patient will need dietary and fluid replacement of the losses from a draining chylothorax.
Chapter 8.00 Instruments and materials review.
Management of chest trauma can be a fast changing scenario, with spillage of pleural fluid and even rapid escalation to a thoraco-laparotomy.
The success of the procedure depends on correct instruments and materials being present, assembled, checked and in working order before the procedure begins.
Dress
All the team should wear sterile operating gowns with aprons and rubber boots, masks and visors.
Equipment
Bedside ultrasound
Hair clippers
Instrument trolley
NB Two sets of the equipment and materials will be needed in case both pleural spaces need drainage or if the first bottle fills rapidly.
Sterile ultrasound sheath
Sterile suction on table.
Sterile trolley cover.
Sterile drapes
Gauze swabs 20
Sponge holders 2
Drain tube
Two 28 French gauge outside diameter.drain tubes.
Ie 28 mm. circumference and 9 mm. external diameter.
Circumference is pi (3.142) times the diameter.
Non kinking when curved.
End hole.
Side drainage holes.
Radio-opaque lining strips in the wall of the tube.
Strip interrupted by the side holes to show position of the drain on post operative chest X ray.
**Remove any metal central rod from the drain and discard.
Danger of damage to intrathoracic and intra abdominal organs from such a rod.
Smaller drain tubes require just as large a skin incision as for a 28, and are more likely to kink and block.
Connecting tubing
Two 28 French gauge outside diameter connecting tubes.
90cm. long to reach from chest to floor.
Connectors 3 per drainage set.
Very important.
1 to connect drain to connecting tube.
1 to connect connecting tube to Under Water Seal bottle.
1 to connect Under Water Seal bottle to wall suction tubing.
Medium artery forcep 1.
To perform the blunt dissection.
Large artery forceps 2.
1 to clamp the non-patient end of the chest drain.
1 to close the other end of the chest drain during insertion into the pleural cavity.
Stitch scissors
Kidney dish
Skin preparation eg 5% aqueous Povidone iodine.
Gallipot for skin preparation.
Local anaesthetic syringe 10ml.
Local anaesthetic needles 15 and 21 swg.
Local anaesthetic 1% lidocaine. 30ml. available.
Scalpel Swann – Morton no 10.
10cm. ruler.
Aspiration needle 18 swg and 20ml. syringe.
Skin suture
No1 silk ( breaking strength 3000gm) on a cutting hand needle. Eg Ethicon W 799.
Underwater seal bottle with top sterilised and sealed.
Artery forceps 2 to clamp connecting tube when moving patient or changing bottles.
Mop
Bucket
Chapter 9.00 Operation review
Under normal circumstances, the procedure below will take 5 – 10 minutes.
As long as all the preparation and checks on equipment and materials have been performed before starting.
In an emergency (eg severe tension pneumothorax), a relieving insertion of a wide bore spinal needle eg 18 swg can be performed within 1 minute.
This will be followed by a formal chest drain insertion.
The procedure consists of:
Environment
Check the personnel
WHO Sign in and Time Out and Preliminaries
Position
Check the skin marking
NB Using ultrasound to identify the site of the empyema directly at the patient’s bedside is safer than in a remote department. The skin marking may become incorrect due to the patient moving.
Stance
Skin Preparation
Towelling up
Check the on-table instruments and materials
Local anaesthesia
Skin incision.
Open fat and intercostal muscles by blunt dissection.
Needling the pleura. Opening the pleural space
Inserting the drain
Take samples of fluid for bacteriology and cytology/ histology.
Suture the drain
Connect drain to Under Water Seal system
Final Touches and WHO Surgical Safety Checklist Sign Out
Chapter 10.00 Environment.
Step 10.01 Check the room.
Ideally an operating theatre has the necessary space, cleanliness and resources for insertion of a chest drain.
If no complications are expected:
A dedicated, spacious and clean side ward is satisfactory.
A normal ward lacks these features usually and should not be used.
Step 10.02 Check the bed/operating table
A bed may be too wide for easy insertion of a drain into the 5th intercostal space.
An operating table will be needed if the procedure may progress to thoraco-laparotomy.
Chapter 11.00 Check the personnel.
Operator
Assistant
Scrub nurse
Runner
Nurse to hold patient’s hand and provide comfort.
Senior medical staff member available to advise and assist as needed.
Chapter 12.00 WHO Sign in and Time Out and Preliminaries.
These checks are complementary to the preliminaries checks in Masterscripts.
Step 12.01 WHO Sign in before the induction of anaesthesia
□ patient has confirmed.
□ identity .
□ site.
□ procedure.
□ consent.
□ site marked/not applicable.
□ anaesthesia safety check completed.
□ pulse oximeter on patient and functioning.
□ Does patient have a known allergy?
□ no
□ yes
Difficult airway/aspiration risk?
□ no
□ yes, and equipment/assistance available
Risk of >500ml blood loss (7ml/kg in children).
□ no.
□ yes, and adequate intravenous access and fluids planned.
Step 12.02 Time out
A short meeting of the team before the skin incision
Confirm all team members have introduced themselves by name and role
□ surgeon, anaesthesia professional and nurse verbally confirm
Patient .
Site.
Procedure
Anticipated critical events
□ surgeon reviews: what are the critical or unexpected steps,
Operative duration, anticipated blood loss?
□ anaesthesia team reviews
Are there any patient-specific concerns?
□ nursing team reviews
Has sterility (including indicator results) been confirmed?
Are there equipment issues or any concerns?
Has antibiotic prophylaxis been given within the last 60 minutes?
□ yes
□ not applicable
Is essential imaging displayed?
□ yes
□ not applicable
Step 12.03 Preliminaries.
Check the relevant investigations.
Chest X-ray
Ultrasound
CT Scan
Weight of patient.
Step 12.04
Check the operator has agreed the technique with his/ her senior.
For a trauma patient:
Be prepared for chest drains on both sides.
Be prepared for emergency thoracotomy and major thoracic surgery
Step 12.05 Check there is no other procedure to do
Step 12.06 Check the incision site
Step 12.07 Identify the Triangle of Safety.
The triangle of safety is an area on the patient’s chest wall which does not carry high risks of damaging underlying intrathoracic organs.
It lies:
Behind the pectoral muscles.
In front of the latissimus dorsi, in the mid axillary line.
Down to the 6th rib.
Strictly speaking, it is a quadrilateral with the fourth side being the apex of the axilla.
A chest drain may be safely inserted in this triangle, but if the effusion is confined to another part of the pleural space, drainage will not be achieved.
Discuss this with a more experienced clinician
The triangle is at the level of the nipple in a male and at the level of the inframammary skin-crease in a female.
In practice, the 6th rib is the essential landmark.
Step 12.08 Check the under water seal bottle.
The diagram below shows the simplest underwater seal system.
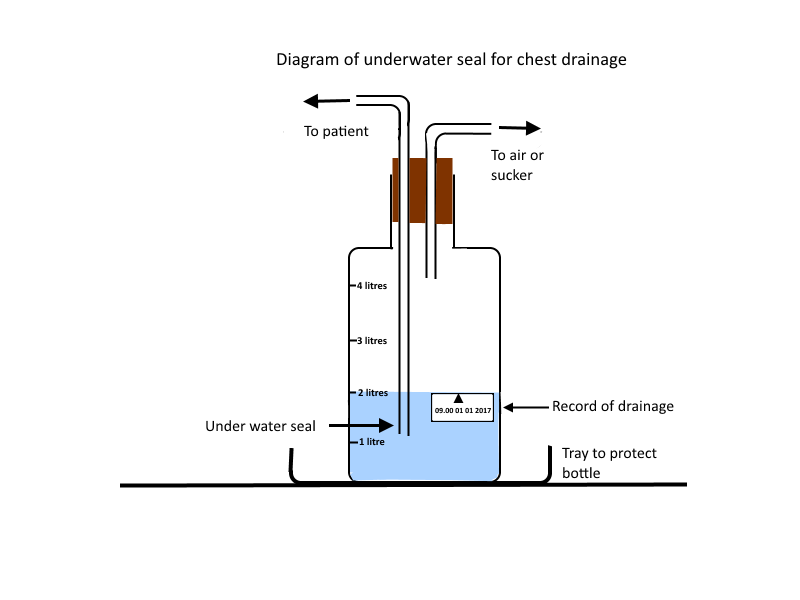
NB. The liquid in the underwater seal system contains 0.9% saline, not water, so that dangers of retrograde flow of fluid into the patient’s chest is minimised.
Other more elaborate systems follow the same principles as here.
There are dozens of systems, all different.
Make sure you understand how the system you are using works.
Unwrap the bottle.
Keep the tube ends on the bottle sterile with a sterile towel.
Place the bottle in a kick tray on the floor at the level of the patient’s chest.
Step 12.09 Check the connecting tubing and chest drain connections.
The connecting tube must be at least 90cm. long to run from the
patient’s chest drain to the underwater seal bottle on the floor.
One connector joins the chest drain to the connecting tube.
The other connector joins the connecting tube to the underwater seal bottle.
Fit the connectors to both ends of the connecting tube and to the bottle.
Do not fit the chest drain to the connecting tube until the pleural space is opened.
Keep the end of the connector sterile in a sterile towel.
Add connectors as needed.
Note that connectors narrow the effective diameter of the tubing of the system.
Some systems have inbuilt connectors.
Step 12.10 Check the reservoir of saline in the bottle.
Pour 2 litres of saline into the bottle.
Check that the lower end of the longer (patient) tube lies 5cm. below the surface of the saline.
This is the “under-water” seal.
Step 12.11 Mark and date the saline level on the bottle.
Use a sticky label or a permanent marker.
Step 12.12 Check the connecting tubing.
Check the patient end of the connecting tubing will fit onto the chest drain.
Use a connector/ adaptor as needed.
Check the other end will fit onto the longer bottle tube using connectors as needed.
Step 12.13 Check 2 arterial forceps are available.
They will be needed to clamp the connecting tube when changing the underwater seal bottles.
Step 12.14 Check the tray for the bottle to stand in to prevent damage by
kicking.
Step 12.15 Check the syringe for aspirating the chest.
20 ml syringe with 18 swg needle.
Step 12.16 Check the cytology bottle and laboratory form.
Step 12.17 Check the bacteriology bottle and laboratory form.
Step 12.18 Check request form for a post insertion Chest Xray.
Postero- anterior erect.
Step 12.19 Check the adhesive bandage to stabilise the connecting tube.
Step 12.20 Check thoracotomy general instruments are available if needed.
Alert thoracic team.
Step 12.20 Check bucket and mop available for spillages.
Chapter 13.00 Position
Supine at 45 degrees if patient can tolerate it.
If not:
Patient may have to have the procedure performed sitting almost upright.
Arm abducted and hand placed behind head.
The arm may need support from a non-scrubbed person.
NB. This is an uncomfortable position to be held for more than 10 minutes or so.
Make sure the procedure is finished within this time.
Chapter 14.00 Check the skin marking.
Use bedside ultrasound to identify the empyema.
Step 14.01 Find the triangle of safety.
Identify the fifth intercostal space in the mid axillary line.
Count down from the 1st interspace under the clavicle.
Continue counting down in the triangle of safety.
Mark the site of the 6th rib
The incision will be into the skin over the 6th rib to make an oblique upward path for the drain tube up to the 5th intercostal space.
Use a skin marker that will not wash off or fade with the skin preparation or tattoo. Eg Magic Marker.
Chapter 15.00 Scrub up.
Operating team scrub up, gown up and put on sterile gloves and goggles.
Chapter 16.00 Stance.
Operator stands on side of drain insertion.
If both sides are to be drained:
Stand on side of greatest injury and drain that side first.
Assistant stands at the patient’s side near the operator.
Scrub nurse with instrument trolley nearest to operator’s dominant hand.
Chapter 17.00 Skin Preparation.
Step 17.01 Clip hairs as needed.
Clip hairs from the hemithorax and axilla.
This will allow good adhesion of Elastoplast that will be holding the connecting tubing to the patient’s chest at the end of the operation.
Clip both sides for traumatic haemothorax/ pneumothorax
Step 17.02 Clean the skin.
Use gauzes in sponge holders
Use 2 applications of eg Povidone iodine (Betadine).
Dry off with a dry gauze, especially for self adhesive drapes.
Chapter 18.00 Towelling up.
Place sterile towels around a 15 cm. area centred on the incision site.
Fix with towel clips or use self adhesive drapes.
Arrange the drapes so that any fluid spilling from the wound will run down into a bucket.
Chapter 19.00 Checking the on-table instruments and materials.
Step 19.01 Check the scalpel eg Swann Morton No 10 or 15
Step 19.02 Check the artery forcep for the blunt dissection.
Step 19.03 Check the drain tube
28 French Gauge ie Circumference is 28mm.
The diameter is about 9mm. (about 1/3 of the circumference or to be precise 1/pi which is 1/ 3.142).
For trauma use 40 French Gauge ie 40mm. in circumference
Remove any metal rod and discard before inserting the drain.
Real danger of serious injury to the patient.
If the non- patient end of the drain is oblique:
Cut it transversly with the stitch scissors.
This will make the connection more secure.
Clamp one artery forcep onto the non-patient end of tube.
This will reduce spillage of pleural fluid.
Grasp the patient end of the drain obliquely with the forcep.
Step 19.04 Check the needle and suture
Step 19.05 Check the scissors.
Step 19.06 Check the kidney dish
To catch fluid spilling from the pleural cavity
Chapter 20.00 Local anaesthesia.
Use a 10ml. syringe.
A 20 ml. syringe may not give enough pressure.
Step 20.01 Fix a green 21 swg (0.8mm. diameter) needle onto the syringe.
Push needle onto the Luer lock and twist until creaking stops.
Step 20.02 Draw up local anaesthetic.
Use 1% plain Lidocaine (Lignocaine).
Check the expiry date.
NB A 1% solution is 10 mg. per ml. NOT 1 mg. per ml.
Maximum dose of Lidocaine is 3mg./ kg.
Ie a maximum volume of 1% Lidocaine for a 70 kg. patient is
20 ml.
Step 20.03 Change to an orange 25 swg (0.5mm.) needle.
Step 20.04 Press on the skin firmly to disguise the sting of the injection.
Step 20.05 Inject 5ml. Lidocaine to raise a skin bleb.
Infiltrate the skin slowly to minimise pain. Eg 20 seconds.
Step 20.06 Change back to a green needle and twist to secure.
Step 20.07 Infiltrate 10ml. Lidocaine slowly into the fat and intercostal spaces.
Wait 5 minutes for the anaesthetic to take effect.
For an obese patient:
You may need to infiltrate in stages.
Infiltrate more anaesthetic as you reach sensitive tissue.
Recheck the incision site.
The swelling of the tissues with the Lidocaine may hide the chosen site for the incision.
Step 20.08 Test the incision site for numbness.
Tap the skin with the end of the needle.
If sensitive:
Wait another 5 minutes.
If still sensitive:
Recheck expiry date of the Lidocane
If within expiry date:
Infiltrate more anaesthetic down to the rib, periosteum and
pleura.
Wait another 5 minutes.
If still sensitive:
Use more anaesthetic until the maximum safe dose has been given.
Ie 3mg/Kg lidocaine
20ml 1% lidocaine for 70 Kg adult
If still sensitive:
Inflamed tissues are resistant to local anaesthetic.
There may be an infected empyema.
Abandon the procedure.
Phone your boss.
Consider sedation or general anaesthetic later.
.
Step 20.09 Problems with local anaesthesia
Overdose leading to:
Bradycardia and asystole
Respiratory arrest
Convulsions
Unconsciousness
Treatment
Supportive until anaesthetic has worn off
Ie Oxygen, ventilation, IV fluids, anticonvulsants, ephedrine
Anaphylactic reactions leading to:
Sweating
Urticaria
Tachycardia
Bronchospasm
Syncope
Treatment
Adrenaline 1mg. subcutaneously.
Chapter 21.00 Making the incision.
Step 21.01 Before you start making the incision:
You must make preparations in case the dissection of the intercostal muscles leads to opening of the pleural space suddenly at an early stage in the dissection.
: Check the drapes will allow liquid to run into the bucket on the floor.
Have your assistant ready to hold the kidney dish against the patient’s chest below the incision.
Have the scrub nurse ready to use the sucker.
Step 21.02 Check the drain again.
Make sure the forcep makes a smooth shape with the end of the drain.
Step 21.03 Skin incision
The skin incision must be the correct length to allow the surgeon to explore the pleural space with his/her forefinger.
If too short, it may lead to life threatening delays in enlarging the incision.
If too long, it may lead to leakage of infected fluids around the chest drain or infection of the pleural space from outside the patient’s chest.
The linear skin incision has two sides that open to make an O shape, with a circumference twice as long as the original incision.
Therefore the correct length of skin incision is HALF the circumference of the base of the surgeon’s forefinger.
It is not related to the drain size, which is much smaller. eg A 28 F chest drain has a circumference of only 2.8 cm. ( The F gauge system is the circumference of a tube in millimetres).
Begin the incision over the 6th. rib just behind the pectoral muscles.
Continue incising the skin along the line of the 6th. rib.
End the incision when it is half the length of the forefinger circumference, anterior to the latissimus dorsi.
Check the length with the ruler.
Step 21.04 Fat and intercostal muscle.
Use blunt dissection with the artery forceps or an index finger.
Push closed forcep jaws into the wound until resistance is felt.
Open jaws wide.
Pull jaws completely out of the skin, still wide open.
Close jaws and reinsert.
Repeat until pleura is met.
A pinky sheet running between the ribs of the intercostal space.
Thickened inflamed tissues suggest an empyema or malignancy
If the blunt dissection is painful:
Wait 3 minutes for anaesthetic to act.
Use more anaesthesia as needed.
Up to 3mg/Kg.
ie 20ml. 1% solution for a 70Kg patient.
If the tissues are still sensitive.
Call your boss
Consider increasing the volume of local anaesthetic.
Step 21.05 Be prepared for:
Forcep or finger suddenly entering the pleural space without warning.
Leading to a sudden gush of liquid and/or air.
Go to Step 23.02
If pleural space not entered:
Continue below.
Chapter 22.00 Needling the pleura.
Step 22.01If the pleural space has not already been opened:
Insert an aspiration needle.
2cm. through the pleura.
If air is withdrawn:
Continue with opening the pleural space
Prepare to release a pneumothorax. See on.
If air is under pressure (tension pneumothorax):
Air leak from the lung, bronchus or trachea.
Let air release slowly to prevent pulmonary oedema.
If frothy blood is aspirated:
You may have needled adherent lung.
Remove the needle.
Insert the needle in another part of the pleura.
Prepare for a very cautious opening of the pleural space.
If the aspirated fluid is blood:
Bright arterial blood suggests major damage to the chest wall, left side of the heart and the aorta.
Prepare for emergency thoracotomy.
Insert a chest drain on the other side as well.
Dark venous blood suggests damage to chest wall, major veins or right side of the heart.
Continue with chest drain insertion.
Emergency thoracotomy may be needed.
For a malignant effusion:
The fluid may be serous, mucous or bloody.
Continue with opening the pleural space.
Be prepared to feel nodules inside the pleural cavity.
Biopsy the pleura if thickened
For chylothorax:
Milky white fluid.
Aspiration rather than drainage.
If no fluid is obtained:
The fluid may be too thick for the needle.
Eg Clotted blood.
Thick pus in an empyema.
Continue with careful opening of the pleural space – see on.
Call for advice from the senior person on standby.
If air mixed with pus and food/liquid is aspirated:
Prepare for drainage of a leak from an oesophageal anastomosis.
Continue with opening the pleural space
If smelly liquid is aspirated:
Suspect a Gram negative empyema.
Continue with opening the pleural space.
Suspect a necrotic intrathoracic stomach.
Call a more experienced clinician.
Chapter 23.00 Opening the pleural space.
Step 23.01 Check the drain.
Have the chest drain with its 2 forceps attached and ready to insert at this stage, in case it is needed rapidly. The diagram below applies to an incision for an index finger of 10cm. circumference.

Step 23.02
Use blunt dissection with your index finger or a large artery forcep
Be prepared for your finger or the forcep entering the pleural space suddenly..
Brace yourself against the operating table for security.
Check the drapes will allow liquid to run into the bucket on the floor.
Have your assistant hold the kidney dish against the patient’s chest below the incision.
Have the scrub nurse holding the sucker.
Continue the dissection.
You will feel your finger or forcep popping through the pleura.
There may a spillage of liquid.
Use the sucker.
Collect any overspill in the kidney dish.
Get your assistant to place a finger over the wound.
Get the chest drain with its 2 artery forceps.
Place your index finger on the joint on the forcep to prevent the tube and forcep suddenly going in too far.
If you do not come across fluid.
Push your finger in further.
If the tissues are too dense.
Call a more experienced operator.
If not done before:
Take samples of the liquid for bacteriology and cytology.
Chapter 24.00 Inserting the drain.
Step 24.01Examine inside the pleural cavity with your index finger.
Feel where the lung is.
It is soft and spongy.
Pink in a child.
Pink and blacked speckled in an adult.
Step 24.02 Open the pleural space enough for insertion of the chest drain at
least beyond the drainage holes in the tube.
Push the drain into the space as far as 5cm. beyond the most proximal
side hole.
Ideally ¾ of the length of the drain.
If the space is too small for the drainage holes to lie in the pleural cavity:
Call a more experienced clinician.
Cutting some of the chest end of the drain containing some of the drain holes may be adequate for drainage.
Step 24.03 Insert the patient end of the drain with its artery forcep into the
pleural space.
For a pneumothorax:
Direct the drain towards the apex of the thorax.
For all other conditions:
Direct the tube downwards.
The liquid at the base of the pleural cavity will drain out.
(Dependent drainage.)
Step 24.04 Remove the artery forcep.
Make sure the drain stays in the pleural cavity.
Push the drain ideally to the apex of the pleural or to the base according to the pathology.
Chapter 25.00 Suture the drain.
Use no 1 silk on a hand cutting needle eg Ethicon W 399.
Weaker sutures may break.
Step 25.01Insert the first stitch into the skin and fat.
Tie off with 4 throws.
4 throws around the drain at skin level.
Tight enough to make a minimal waist on the drain and prevent slipping.
A lattice pattern of the suture round the tube will usually slip.
Stitch through the skin and fat again.
4 throws to finish the knot.
This will prevent the drain slipping out.
Cut the ends 4cm. long for easy removal later.
Step 25.02 Insert extra interrupted stitches to close the skin.
Step 25.03 Dress the wound with gauze swabs cut half way across to go
round the tubing.
Step 26.04 Secure the dressings with 4 inch Elastoplast.
Step 26.05 Curve the connecting tube onto the patient’s chest.
This will protect against:
Kinking.
Blockage of the tubing.
Accidental knocking of the tubing.
Painful traction on the skin wound.
Secure the tubing onto the patient’s chest with 4 inch Elastoplast.
Chapter 26.00 Connect to the under water seal system.
Step 26.01 Connect the drain tube to the connecting tube using a connector.
Step 26.02 Release the forcep on non-patient end of the chest drain..
Step 26.03 Look for:
Air bubbles in the tubes.
Check for leaks in the tubing including the drainage holes.
Suspect leakage from the lung or other intrathoracic organs.
Liquid level in bottom of the longer waterseal tube swinging with respiration.
If not:
Check the tubing is not kinked.
Look for liquid flowing.
Ie Collecting in the bottle.
Debris visible flowing along the tubing.
If not:
Check for clots in the tubing.
Kink and squeeze a length of tubing to pump blood clot along.
Call a more experienced person.
Sudden release of gas may indicate lung damage from the drain dissection.
Continue the drainage procedure and manage such a leak conservatively initially.
Step 26.04 Estimate and record the drainage.
Reposition the fluid level marker on the bottle after each recording.
Be prepared to replace the bottle with another (containing 2 litres of saline) if the bottle contains more than 3 litres of fluid.
Step 26.05 Check there is no other procedure to perform.
Chapter 27.00 Final Touches and WHO Surgical Safety Checklist Sign Out
Step 27.01 Check swab, needle and instrument counts.
Step 27.02 Clean up the patient and the operating area.
Step 27.03 Write records and sign.
Step 27.04 WHO Surgical Safety Checklist Sign Out
Nurse verbally confirms with the team:
The name of the procedure recorded
That instrument, sponge and needle counts are correct (or not applicable).
How the specimen(s) are labelled (including patient name).
Whether there are any equipment problems to be addressed
Surgeon, anaesthesia professional and nurse review the key concerns for recovery and management of this patient.
Chapter 28.00 Postoperative care.
Step 28.01 Look out for:
Air leak
Pulmonary oedema.
Sudden chest pain and breathlessness during too speedy
release of fluid from the pleural space.
Partly clamp the connecting tubing to slow the flow.
Tubes blocking or kinking.
Try milking the blocked tubing.
Apply gentle suction to the under water seal suction tube.
Call a more experienced clinician.
Consider reinserting the drain.
Connections detaching.
Secure the connectors more tightly.
Bottle over filling.
If blood:
Suggests serious bleeding.
Call a more experienced clinician.
Step 28.02 Observations
Hourly for the first 6 hours, then 4 hourly.
Pulse
Blood pressure
O2 saturation.
Respiratory rate.
Drainage volume and colour.
Presence/ absence of bubbles.
Step 28.03 Prescribe Analgesia
As needed.
Step 28.04 Write a report in the case notes and sign.
Ie. What was found, what was done and what the plans are.
Step 28.05 Letter to GP, referring consultant and copy to patient
Step 28.06 Fill in Audit form
Step 28 .07 Order a chest X-ray erect postero-anterior.
Look at the films for:
Correct tube position.
Progress of reduction of remaining fluid
Chapter 29.00 Equipment and materials
Bedside ultrasound
Sterile ultrasound sheath
Hair clippers
Instrument trolley
Sterile suction on table.
Sterile trolley cover.
Sterile drapes
Gauze swabs 20
Sponge holders 2
Scalpel Swann-Morton no 10 or 15
Drain tube
28 French gauge outside diameter.
Ie 28 mm. circumference and 9 mm. external diameter.
Circumference is pi (3.142) times the diameter.
Non kinking when curved.
End hole
Side drainage holes.
Radio-opaque lining strips in the wall of the tube.
Strip interrupted by the side holes to show position of the drain on post operative chest X ray.
Remove any metal central rod from the drain and discard.
Danger of damage to intrathoracic and intra abdominal organs.
Smaller drain tubes require just as large an incision as for a 28, and are more likely to kink and block.
Connecting tubing
28 French gauge outside diameter
90cm. long to reach from chest to floor.
Connectors 3
Very important
1 To connect drain to connecting tube.
1 To connect connecting tube to Under water seal bottle.
1 To connect Under water seal to wall suction tubing.
Medium artery forcep 1
To perform the blunt dissection.
Large artery forceps 2.
1 to clamp the non-patient end of the chest drain.
1 to support the other end of the chest drain during insertion into the pleural cavity.
Stitch scissors
Kidney dish
Skin preparation
5% aqueous Povidone iodine.
Gallipot for skin preparation.
Local anaesthetic syringe 10ml.
Anaesthetic needles 15 and 21 swg.
Local anaesthetic 1% lidocaine. 30ml. available.
Aspiration needle 18 swg and a 20 ml. syringe.
Skin suture no1 silk ( breaking strength 3000gm) on a cutting hand needle.
Eg Ethicon W 799.
Underwater seal bottle
2 Artery forceps to clamp connecting tube when moving patient or changing bottles.
Mop
Bucket
Kick tray to protect the UWS bottle from being kicked
Chapter 30.00 Feedback, Comments and Audit.]
Chapter 31.00 Alterations, Additions, and Amendments
31 08 2017 Use ultrasound guidance for chest drain insertion whenever possible. British Medical Journal Best Practice 2016
27 11 2017 Never use a trocar.
16 12 2017 Kick tray to protect the Under Water Seal bottle from being kicked.
31 12 2017
06 01 2018 If the tissues are still sensitive after 3 minutes:
Wait another 3 minutes.
If still sensitive:
Recheck expiry date of the Lidocane
If within expiry date:
Infiltrate more anaesthetic.
If still sensitive:
Use more anaesthetic until the maximum safe dose has been given.
If still sensitive:
Abandon the procedure.
Consider sedation or general anaesthetic later
12 01 2018
21.04 Up to 3mg/Kg.
ie 20ml. 1% solution for a 70Kg patient.
If the tissues are still sensitive.
Call your boss
Consider increasing the volume of local anaesthetic.
Chapter 32.00 Insertion of chest drains during thoracotomy.
This procedure entails pulling 2 chest drains out through the chest wall, instead of pushing in from the outside..
Step 32.01 Cut the non patient end of the first drain obliquely at 45 degrees.
This will ease the passage of the drain outwards through the chest wall.
Step 32.02 Get ready to grasp the long lip of the obliquely cut drain with the large artery forceps.
Step 32 .03 Place one hand inside the bottom of the pleural space.
Step 32.04 Identify the anterior part of the 10th intercostal space.
Step 32 05 Make a 2cm. incision over skin of the 10th intercostal rib.
Step 32 .06 Burrow down to the 10th rib.
Use a large artery forcep.
Step 32 .07 Burrow over the top of the 10th rib to enter the pleural space.
Step 32.08 Place the drain in the pleural space via the thoracotomy wound.
Grasp the long lip of the patient end of the chest drain.
Use the long artery forceps.
Step 32.09 Pull the drain though the intercostal space from inside to out.
Keep the side holes of the drain in the pleural space.
Step 32.10 Place the patient end of the drain in the apex of the pleural space.
Step 32.11 Remove the artery forcep from the drain.
Step 32.12 Cut the non patient end of the drain transversely.
Step 32 .13 Suture the drain.
Use no 1 silk on a hand cutting needle eg Ethicon W 399.
Weaker sutures may break.
Insert the first stitch into the skin and fat
4 throws around the drain at skin level.
Tight enough to make a minimal waist on the drain.
Stitch through the skin and fat.
Tie off with 4 throws.
Cut the ends 4cm. long.
Insert interrupted skin stitches to close the skin incision.
This is the Anterior Apical chest drain secured.
Step 32.14
Repeat for the Basal drain at the Back of the 10th intercostal space.
GO TO: Chapter 25.00 Connect to Under water seal system